Gameplay & Guides
Misc videos of gameplay + tutorials
Classic "Road to SSL" Series
These speed thru the ranks to Champ/GC.
They only use mechanics they've seen someone else use...
...but then are obscenely consistent with them.
(They are made by pros or former-pros)
They contain some tips...
...and are somewhat useful (as an example of what play at a given level could look like)
...but I think AirCharged's videos are more broadly informative.
Leth is extremely gracious to dodgy teammates.
He does a pretty good job keeping to the skill level of the lobby.
The explanations of his thought process are decent, but a lot of it is just "Leth plays the game (at a lower skill level)"
It's hard to tell the ranks because it's split between 2s and 3s, and they're at different ranks.
Start: The 2024 Road to SSL is FINALLY HERE
New season rank reset: I've been demoted... | RTSSL 2024 #14
Squishy is fairly gracious to dodgy teammates.
He seems to often have a hard time matching the skill level of the lobby.
He provides a few easy-to-follow rules and other positional/play tips (which work pretty well IME)
... but I think a lot of the rules only work well if you have achieved a certain level of skill
... and Squishy is also extremely good at Rocket League, and has been so for quite some time
... so I think he's somewhat disconnected from what a "regular" play experience looks like.
Bronze: ROAD TO SUPERSONIC LEGEND RETURNS!
Silver: Road to SSL (EP. 2)
Gold: Road to SSL (EP. 3)
Plat: Road to SSL (EP. 4)
Diamond: Road to SSL (EP. 5)
Champ 1: Road to SSL (EP. 6)
Champ 2: Road to SSL (EP. 7)
Champ 3: Road to SSL (EP. 8)
GC 1: Road to SSL (EP. 9)
GC 2: Road to SSL (EP. 13)
GC 3: Road to SSL (EP. 16)
GC 2 (again): Road to SSL (EP. 12)
GC 3 (again): Road to SSL (EP. 23)
SSL: Road to SSL (EP. 24)
AirCharged "Fundamentals to ..."
AirCharged uses extremely basic mechanics, excellent positioning, and a few foundational rules to dominate games[1].
Compared to Leth and Squishy, he is not very gracious to dodgy teammates
... but isn't that the True Rocket League® Experience™ ?
He doesn't really try to match the skill level of his lobbies, instead he is following a number of directives.
Something like these:
- Prioritize pacifist play
- Prioritize defense
- Use as few tools as possible
(Thru Champ ... just a simple double-jump ... timed well)
The result is a very good view into what your lobbies could look like, at various ranks.
Not much time is spent on ranks below Diamond, but... fair... once you can reliably hit the ball reliably, you should escape the ranks below that pretty quickly.
2024 Original (2v2)
How To Win At Rocket League With FUNdamental's E.1
- On success predictors:
- Time spent behind the ball
- Not speed
- Not mechanics
- (He also emphasizes car control)
- General:
- Prioritize passive play.
- Prioritize staying in the center lane.
- Go TO the ball with boost, then slow down for the touch (for control)
- Single jump on 50s
- On offense / First Man:
- Never dive at the ball.
- Never go in the corners.
- Before going for an offensive play, aim to separate the opponents (so it becomes 1v1 or 2v1) before going for an offensive play
- On defense / Second Man:
- Never dive at the ball.
- Never go in the corners
- Funnel balls slow toward the side as they approach your goal.
- Shadow your teammate, or the opponent if they're closer.
- On the wall: Match the height of the ball, or a bit higher.
- On the field: Angle your car for convenience...
- ... to deflect any surprise balls conveniently
- ... to position conveniently for the jump / aerial / save
- ... to be able to turn around quickly
One Move Is All You Need For Diamond PROOF HERE! FUNdamental's To GC E.2
- (Traditional) Rotation is tricky.
- At the moment you rotate, the positions blend.
- Then, 2 players end up in No Man's Land.
- This is the moment to strike as an attacker.
- And in a traditional rotation, this is pretty easy to read.
- (Organic) Rotation is still tricky.
- But because it's done ad-hoc, it's much harder to read.
- It's also more adaptable.
- "Front-end Aggression"
- Get to the position early (supersonic)
- Then hit the brakes, gather more data, and have an more controlled shot on target.
- "Rhythm Breaking"
- The match has a rhythm.
- If you go with the rhythm, then slower/faster, you can "break" it and get some free touches as the other players dive for the ball incorrectly.
- "Volatility"
- Some plays lead to high-volatility in the ball. Where you do not know quite what will happen, but it's happening quite quickly.
- Taking 50s increases volatility.
- Taking (most) pinches increases volatility.
- Challenging in corner increases volatility.
- Hard 50s increases volatility.
- "Defend from Deep in Net"
- It makes many saves easier.
- It gives you a very good route to attack the opposing net.
- From this position, wait until you have backup (or must go for the ball).
- If your teammate has gone to challenge in the corner, wait until the opposition misses a shot. Do not also enter the corner.
Champ 1 Hook Shots And Double Jumps MELT CHAMPS! FUNdamental's To GC E.3
- "All we need" to Champ 2/3
- Stay Central
- Protect
- Back-up
- Put the ball high
- Hookshots
- Jabs
- Double-jumps
- On defense: "Always want to go on to the backboard as first man to block it off"
- Let your teammate work, stay central, no need to move around
- Rocket League has become very offense-centric
- The just don't do any defending
- The offense is actually also pretty poor
- ... but it only works because the defense is so poor
- On defense:
- Tap the ball into the corner ...
- ... then position your car between corner and the net ...
- ... it sticks to the wall
- ... typically forcing them to shoot it along wall
- ... giving you an easy instant clear (away from net or across net, your choice)
- ... which is so fast, they will often not be able to react
- "They're trying too much..."
- They're trying to be the man...
- You don't have to do much!
- (Even with two defenders at net!)
- Just throw the ball at the opponents' net ...
- ... watch the complexity as they have to make a quick decision ...
- ... and frequently double-commit to the "save" because they don't trust each other
- Don't hit the ball just to hit the ball
- We want to keep hold of the ball.
- We want to bounce it off surfaces that we can follow.
- Read: Stop handing it to the opponents! Stop clearing it for the opponents!
- See also: Let your teammate work!
- There is nothing wrong with waiting in net, as long as you have a plan!
- If your 1st man understands the game
... and has a plan
... and they've funneled it well
... waiting in net is such a good idea! - (He says something about achieving most of his 60k goals starting from his own net)
- If your 1st man understands the game
You Can Walk It In Without Boost If You Are Willing To Just Try! FUNdamental's To GC E.4
- "Always try to block the front post"
- I guess this means he rejects back-post rotations?
- TBH it makes sense. If you can confidently redirect the ball softly into corner, it is SO safe.
- This also means that if the opposition is trying to bounce it off side wall into center after you touched it wall-side... rotate ball-side and block the ball from corner as it tries to pass front-post (then into net... maybe?)
- Keep the ball on the outside (until it is time to counter and attack)
- Keep away from your teammate.
- Stop throwing the ball away by default. Touch it softly to somewhere else you can influence.
2025 Reboot (2v2)
I think this one starts in low GC, with AirCharged losing his mind at dodgy teammates.
2024 SSL (3v3)
Guides
Positioning
AirCharged Tips
- Short: Don't Rotate, Think Instead About Your Role
- Short: What Is My Role In Defence As 2nd Man?
- 30m: ROAD TO GC 2v2 AS SLOWEST PLAYER: How To Use Roles Instead Of Rotation To Dominate 2v2!
- He talks about having a Funneler (to deflect the ball to the sides)
- And a Defender (to clear the ball and begin the offensive play)
AirCharged Guides (Series?)
These are all from Rocket League Master Class.
Roughly categorized based on vibes.
AirCharged Strategy
- (28) 1v1 Strategy
- (29) 2v2 Strategy
- (30) 3v3 Strategy
- "Quiz" — (4) Decision-making Quiz?
- "Quiz" — (16) Decision-making Quiz? (again?)
- "Quiz" — (26) Aerial Decision-making Quiz?
- "Test" — (31) "The Black Belt Test" ??
AirCharged Defensive
- (5) Low 50s
- (10) Fake
- (11) 50s
- (12) Shadow Defend
- (13) "Faceout" Defend
- (14) Fake (on Defense)
- (15) Challenge (on Defense)
- (27) Aerial Defense
AirCharged Offensive
- (1) Hook Shot
- (2) Flick
- (3) Air Dribble
- (6) Bounce Dribble
- (7) Air Dribble (again?)
- (8) Power Shot
- (9) Air Roll Shot
- (17) Kickoffs
- (18) Wall-shot
- (19) Aerial Control
- (20) Fast Aerial
- (21) Air Dribble (again?)
- (22) Double Touch
- (23) Ceiling Shot
- (24) Redirect
- (25) Double Touch (from ground)
- (32) Power-slide cut (like Flakes) (whoever that is?)
Are people playing 2s in a wrong way? : r/RocketLeagueSchool
Yes and no. Is applying pressure the meta? yes. Is it more optimal than a defensive passive approach, in 3s definitely it is. In 2s sometimes yes and sometimes no, let me elaborate.
Let's start by defining the 2 playstyles:
Pressure Playstyle: Applying pressure is a very broad term. Placing the ball in awkward spots for the opponent to save, keeping possession, tactical demos, stealing boost, keeping high momentum while making the opponents not able to keep high momentum. All of this is what makes high pressure playstyle what it is.
Passive defensive playstyles: popularized by Flakes, the Pacifist method by AirCharged being an extrapolation of it. They theoretically have focus on keeping possession, slowing down the plays, forcing counter attacks and 2v1 and 1v1 situations. Theoretically it sounds good, what happens in reality in lobbies where opponents have a brain and are able to keep momentum up and turn bad situations into good ones is that more often than not you rely too much on defending, on shadow defending, fake challenging, bringing the play to your corner, and play from there.
The two playstyles might seem opposites but they aren't. Air Charged is analysing a pressure playstyle that instead of taking advantage of the pressure built, is rushing attacking plays into not favourable situations, the players are losing possession by driving the play into the opponents corners, doing very predictable centers into midfield, and leaving the attacking 2nd man on a spot where he/she either has to commit to a risky shot or to give away the ball completely and defend a bad 2v1 situation. That's not how Pressure Playstyles work. 1st mans aren't supposed to lose possession putting the ball mid without reaching any tactical advantage previously, you at least need to build boost advantage, you have to build positional advantage, and you have to build space advantage.
Air Charged Pacifist playstyle, and defensive playstyles in general, are popular because they exploit the situation that I just explained. In better words, they exploit the lack of brain and the lack of tactical ability of the opponents. What happens though, it's that you can just counter Pacifist Playstyles with actual good Pressure, keeping the ball close, forcing favorable 50s and building up the position until the opponents are overwhelmed. Also, shadow defending into your own corner gets extremely risky if the opponents first man plays it right, exploits low momentum by demo chasing and rotating fast through middle instead of forcing a rushed center without any previous build up.
Finally, as I said previously, the two systems aren't opposites, so they can be used interchangeably in different situations, you can't keep possession for the whole game, that's just not possible, and in many situations you are forced into defensive situations that only allow for a more passive "drive the play into the corner" approach. Also, you can be a very aggressive pressure focused player, but knowing how to shine in transitions, both defensively and offensively, is the bread and butter or RL. And a mix of the two is most likely going to happen in most games.
AirCharged actually explains perfectly the situation in minute 16:00 of the video. "Why not not go for that? Just go for demo...". What he is implying here is that Pressure Playstyles and Systems don't take this tactical variable into consideration, they do. But most players just play the game in such autopilot, that just using a little bit of the brain against them (which usually means just let them fuck up by themselves) usually results in the right counter. Again in 2s this tactical voids are just way more obvious and exploitable. In 3s, sorry to say, but having a passive playstyle isn't going to ever be meta, because the fast counterattack and 2v1 situations that are created in 2s are easily countered by 2nd man blocks and 3rd man space control. And in 3s boost control is so prevalent that you either try to be positionally aggressive in midfield or you are just going to struggle.
Just a quick football reference. What's better High Press, Tiki Taka, Catenaccio? 433, 442, 4231? It depends, what's better objectively is what works, and you can make any of those work with the right players. Are some systems in theory superior to others? Yes. Can a team using a theoretically inferior system win against a team that plays the more meta system? Yes. Can a tactical system just be overthrown by a single player technical ability? Yes.
I hit GC in twos!! : r/RocketLeagueSchool
Into the system
Standard – Standard RL
Pull/drag back – Forcing opponents to our corner, and initiating the offence either from a reset or from…
Counter – One preventing central pressure, one sat deep in net, waiting to make a counter/ 2v1
2v1 – Once a successful 2v1 has been created (ideally in our own defensive area), go nuts and just smash the ball toward the opponents net and try a heavy collapse, this is because if we score great, if not we blend into pull/drag back or counter and we go again from an even more dominant situation.
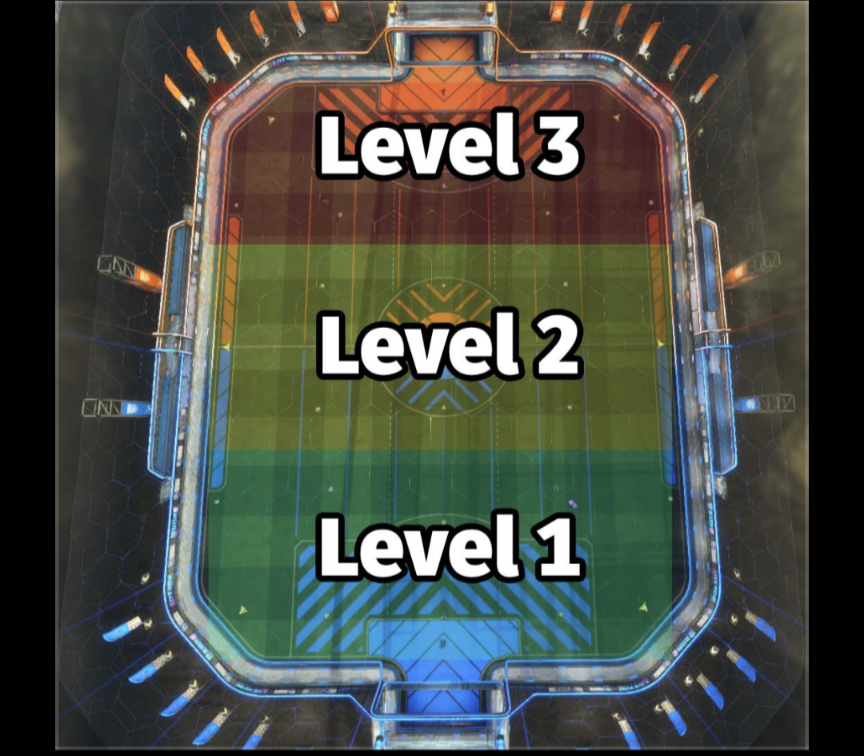
Levels – Passive – Making sure that we can get to Level 3 as soon as possible from counter, and overall strategy has respect to levels.
Standard
Standard is the most basic form of rocket league, although I don’t believe it important to start here as many players absorb this style through osmosis. Essentially this is a pressure based (outdated) system whereby players just continue to force the ball forward anyway they can, either via the wing and corners or shots to toward net. After taking a hit or making a play, rotating behind the team mate to let them have a go on the play with outward momentum, whilst the original player gets boost.
Sometimes this is useful to use, however only if we use the most crucial passive system in Rocket league, especially at ranks of GC and under, levels.
Levels
Levels always pays attention to boost zones and levels. The idea being the opponents back boosts are the highest level achievable, getting to level 3 as soon as possible will make all other systems, extremely easy to execute. Lets look at each level and what it means.
Level 1 – This is the base, you need level 1 for basic survival and ability to counter in most cases. Imagine level 1 as putting on your karate outfit (gi) with just a white belt. It’s the very building block that can allow you to reach your potential, and is certainly better than level 0 (never having a lesson).
Level 2 – The infamous saying in rocket league is “the team that controls the mid boost, controls the game”. This is true, as being able to achieve level 2 earlier than the other team, allows you to either blend into standard, or back off with advantage to play the other systems (we will get onto). Or it can even allow you to aggress and take the level 3 boosts. This gives a sizable advantage so its similar to a purple/brown belt.
Level 3 – The crème de la crème. Having the level 3 boost usually means that you can continue pressure, or blend into the drag back system. This, if played correctly can allow total control of the opposing team, and essentially creates a ticking time bomb. Consider this black belt level.
Drag back
In a situation you have either grabbed level 2/3 or level 2, or, the opponents got level 3 (technically their level 1). Then the drag back can be used to help strip the boost and allow a reset. To perform this, have a player shadow close, and the second player shadow far, this creates a double level of protection and can help blend into what drag back is designed for, transitional play.
Whilst performing the drag back, the idea is to pin the opponents to the outside wall, forcing them to push the ball down the wing where the close shadower can take the big boosts from beneath their feet. The far shadower then rotates and sits deep in the net and waits for counter to begin.
If the player has good control they may either go up the wall or try a shot flick. The far shadow player has the job of controlling this to safely, ideally to their opposite corner. This allows the player on the close shadow to take all the boosts and then they can head into deep net position, unless 2v1 has already been achieved.
Counter
The goal of drag back is to have one player preventing the opponent from establishing central threats by positioning in the centre and shadowing relatively close. Whilst the second player waits deep in net ready to punish the over commit. Once an overcommit has happened, the player who was shadowing close immediately pushes to take advantage of the dive/overcommit from the opponent. The player deep in net clears the ball as hard as they can, the goal for these two is to try and push the ball high, or to get a quick offensive play off (power shot/flick). If they are unsuccessful then whilst making this play, they are constantly aware of levels. Once a play is made, both players will assess what boosts they can take, ideally taking both level 3 boosts whilst staying safe. This often means the player defending will use boost at an alarming rate, again, the goal is to consistently put the ball high.
If continually pressuring isn’t getting the job done, but the players are boost starved, or pressing out of fear, blend straight back into drag back to pull them both further toward your net with less boost then start again. There will be a possibility of being able to cut the player and going into 2v1.
2v1
The main goal in 2s, to create 2v1s and not allow 2v1s. We can create 2v1s a multitude of ways based on the other systems, but the main goal here is to have the ball, yourself and your team mate ahead of at least one of the opponent team, this allows a barrage of attacks, from demo players, to passes and even backboard plays.
AirCharged Guides (Long)
AirCharged Training Packs
4 Week Rocket League Training Program - Grounded
Vince's Strength and Accuracy pack 6CF3-4C0B-32B4-1AC7
Shot's you shouldn't miss pack 42BF-686D-E047-574B
Lockdown Rocket League 4 Week Defensive Program
Backboard Sequence 20C1-273B-99B9-B96C
Hover Method 113F-22F0-1669-0D18
Back Post Defence D501-9351-6430-FB30
Specific Mechanics
...mostly ... there's at least one in Diamond 3 where he gets a full-toxic teammate and it becomes more-or-less 3v1, forcing him to pull out some fancy mechs to get the initial MMR bump he's aiming for. ↩︎